
By Julia , January 17, 2024 · 6 min read
How to build a Celigo flow? Integrate Shopify and Mailchimp to sync customers
What is Celigo?
Celigo is your go-to for making business connections easy. This Integration Platform as a Service (iPaaS) is a cloud-based solution, allowing you to link up various services without needing to code. If you're curious about iPaaS or want to check out platforms like Celigo, read our latest article here. Simplify your business connections with Celigo's straightforward iPaaS solution.
What does Celigo offer?
It has a lot of predefined connections that will help you build your integrations as fast and painlessly as possible. With it, you don’t need to worry about the security of your integrations and you are sure to have one place. It has advanced features that help you map or convert your data. You can easily create conditions and branches in your workflows which adds flexibility to your work.
Celigo in Action: Simplifying Shopify to Mailchimp Integration
In this example, I will show how to create a very simple flow. Its goal will be to import Shopify’s customers into Mailchimp. This is just an example to present Celigo’s features and how you can work with this tool. You can use Celigo to integrate many different applications, not only these two. On the other hand, Celigo is definitely not the only way to integrate Shopify and Mailchimp, you can also, for instance, use the existing Mailchimp app for Shopify. However, if you need to connect many services or do many custom connections between them, it may be very useful to keep all your integrations together.
Create connections
We will start by creating a Shopify and Mailchimp connection. Thanks to predefined connections, you don’t need to provide API tokens each time you create a Celigo workflow. To create one, you just need to select “Connections” from the sidebar. Then you can choose one of many services. Both Mailchimp and Shopify are available. For Mailchimp, all you need to do is fill in these fields:
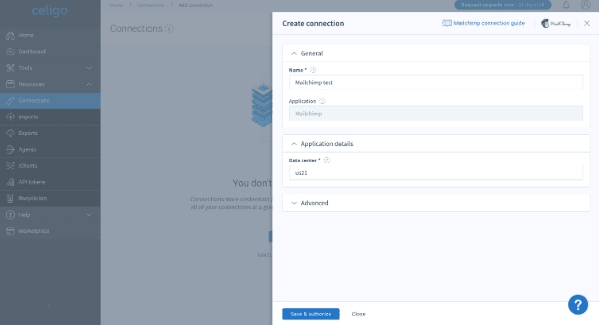
You will find “Data center” in your Mailchimp’s admin URL (for https://us21.admin.mailchimp.com/, data center is u21) Then you will be prompted to log in to Mailchimp and authorize Celigo. That’s it!
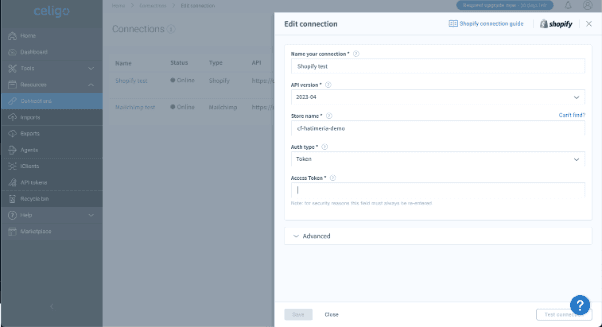
For Shopify, I selected the token auth type. Then I created a private app first in Shopify’s admin and granted it needed scopes. I obtained the API token and pasted it here:
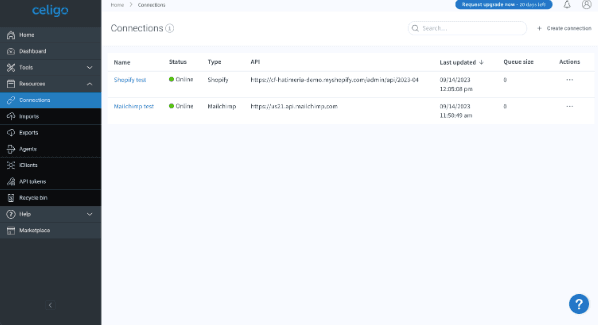
After this, both our connections are up and running. Of course, you can create connections for all the services that you need.
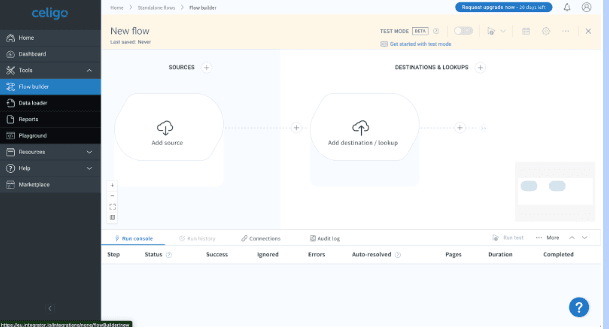
Create a Celigo flow Now we will create our first Celigo flow. Flow defines what steps are needed to transfer data from a source application to a destination application.
Add source First, we need to add a source step. We select Shopify from a list of available options. Then we can select the connection that we added in a previous step:


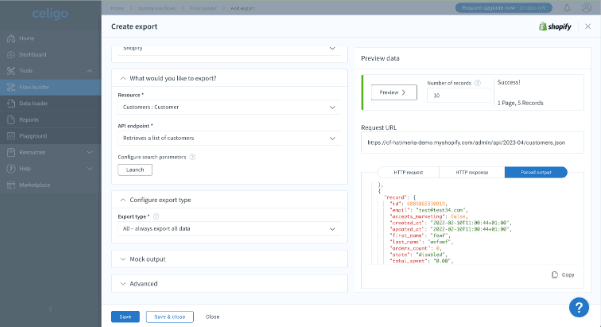
We will want to pull customers' data. To do so, you don’t need to look through Shopify’s API documentation or build GraphQL requests by yourself. Celigo has it prepared for you. You can simply select “Customers” as a resource and “Retrieve a list of Customers”. It will hit the Shopify REST endpoint and retrieve your data. You can also preview your data at once:
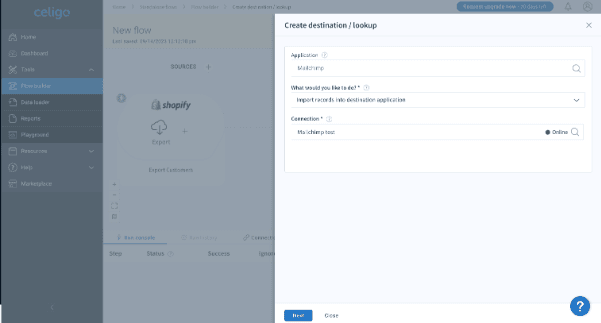
Add destination Now we need to pass our data further. We will try to create contacts in Mailchimp for each of our customers. To do so, we will add another step to our workflow and we will select Mailchimp as an “Application” and our previously created Mailchimp connection:
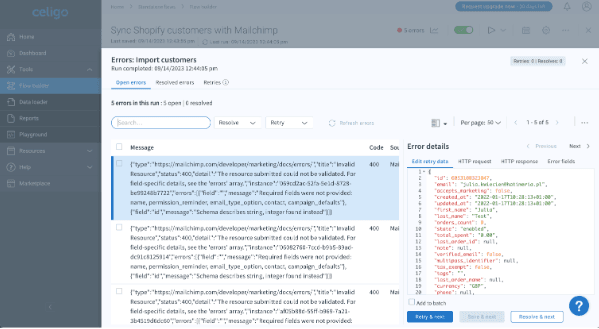
As with Shopify, we need to select the correct endpoint from the selector. We will go here with “Lists/Audiences” for the “API name” field and “Members: Add or update list members” for “Operation”. “List ID” (required for this operation) needs to be obtained from our Mailchimp account. Still, if we click preview, we will see that there are a couple of errors returned.
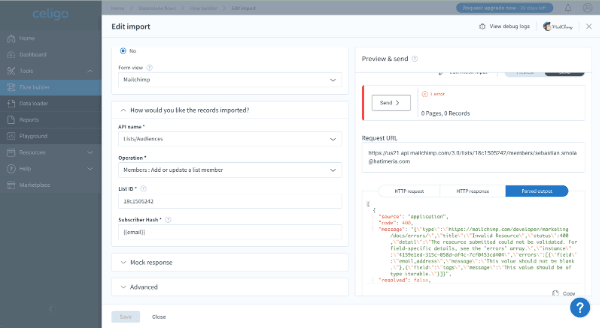
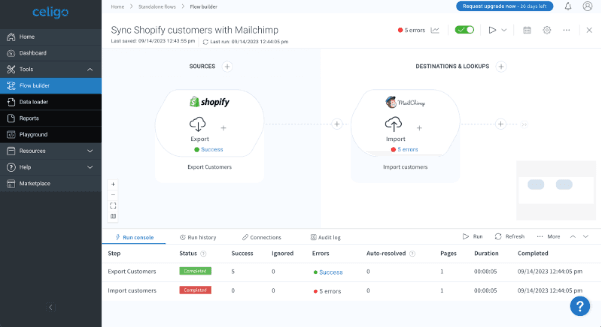
Handle errors and map data We will also see errors if we try to run our workflow. Customers are correctly retrieved from Shopify, but they cannot be imported into Mailchimp.
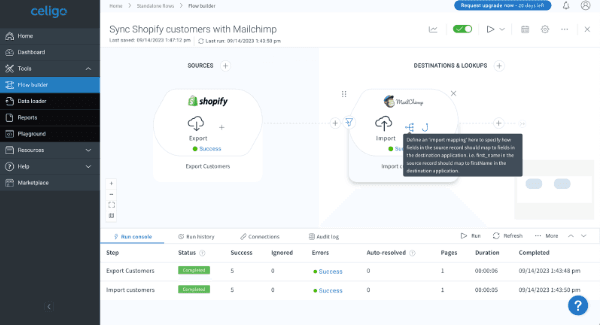
We will need to fix the mapping between Shopify and Mailchimp data. Everything we need to create a Mailchimp contact is available in Shopify data, but field names don’t match. You can fix it by defining “Import mapping”:
Luckily, Celigo already knows what we may need for this endpoint and will help us with these hints:
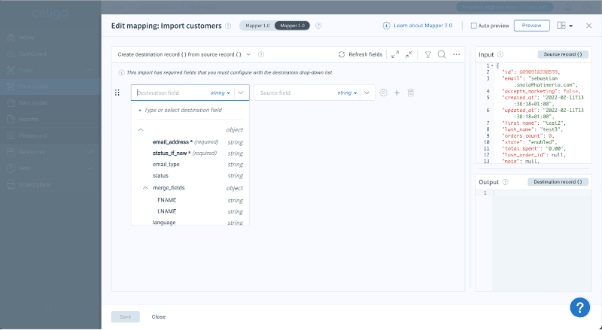
We can map data (in our case, for example, the source field “address” should be mapped to the destination field “email_address”) and save it.
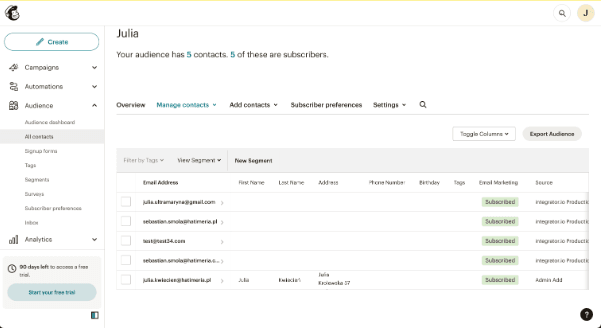
This time, the flow run is successful. We can see that customers were transferred to Mailchimp:
This is only a small example of what you can do with Celigo. Thanks to its no-code approach, it is intuitive and easy to use. Building integration between different apps may be much faster and easier.
Summary:
Celigo, a leading Integration Platform as a Service (iPaaS) provider, empowers businesses with a cloud-based, no-code solution for seamlessly building integrations between multiple services. With advanced features, predefined connections, and the flexibility to create tailored workflows, Celigo simplifies the integration process, providing a secure and efficient experience. In this guide, we explored the steps to build a Celigo flow, using the example of integrating Shopify and Mailchimp to sync customers. From creating connections to handling errors and mapping data, Celigo's no-code approach ensures an intuitive and easy-to-use experience.
Take the Next Step:
Now, it's time to take action. Explore the top iPaaS providers and discover the perfect fit for your unique business needs. Contact Hatimeria for expert advice and start simplifying your workflows today. Streamline your processes, enhance efficiency, and embark on a journey towards seamless connections.
Would you like to innovate your ecommerce project with Hatimeria?

A mountain lover and code climber. She can reach any peak and conquer any coding challenge. Loves ramen, reading books and watching TV series. Wins every Hatimeria competition.